
Let’s take a look at how to burn ISO on Mac OS i.e. how to make a bootable Mac os flash drive?
First, let’s figure out what ISOs are and how they are created. ISO is an optical disc image file that can be obtained from any archive. Therefore, first we make an archive (by any archiver). Then open the context menu, there Open in the program and select the disk utility, then ISO images and Write to the toolbar. Choose a place to save, and get an ISO file.
If you just need to write an existing image to disk, then there is nothing difficult. We go to the standard applications – Utilities, there we select Disk Utility and Burn, the image is successfully written to the disc.
If necessary, you can use the special UltraISO Mac OS, which is free to download, for example, from this link: https://formac.informer.com/ultraiso.
More specific situations are worth considering. For example, if you want to know how to create an image of a Mac OS system in the form of an ISO, then not so long ago a new version of the Carbon Copy Cloner utility was released that allows you to do this . Download, install, and open.

Click Source, choose Macintosh SSD.

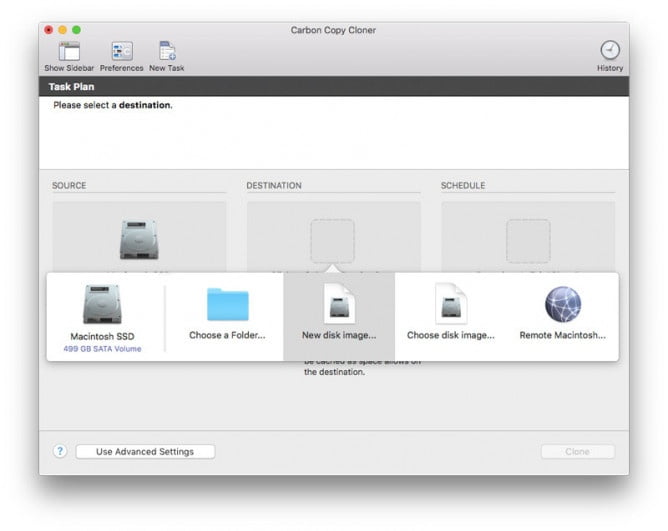
Attention, if you are satisfied with the option to write a dmg image to a Mac OS disk, that is, a simple reading is enough, then you can skip the next step. If you want to be able to edit the image, then in Image Format check read/write sparse disk image.
Create a Clone button and confirm. The disk image will be created in a few hours.
Next, we will consider creating a specific bootable USB flash drive. How to make a bootable mac os flash drive? There are other options, but in this case, in order to write an ISO image to a macOS Sierra flash drive (bootable), the Terminal is best suited. Just in case, take a USB flash drive of at least 16 gigabytes.
First, the flash drive is formatted.
We open the well-known Mac OS Terminal and enter the following command, instead of remontka.pro, of course, there should be the name of your flash drive.
sudo / Applications / Install macOS Sierra.app/Contents/Resources/createinstallmedia —volume /Volumes/remontka.pro —applicationpath / Applications / Install macOS Sierra.app —nointeraction
In principle, everything is very simple. You just need to confirm the command by entering your administrator password and wait for the process to end, and then you can close the Terminal and pick up your bootable USB flash drive, which can now be successfully used if something happens.


